
|
|
This Guide is constructed using a hyperlinked table of contents for ease of navigating. Hyperlinked refers to the linking of the paragraph headings to the table of contents. When you want to go to a particular section of the Guide, go to the heading in the table of contents, hold down the Ctrl key and mouse click on the heading. The link will jump to the page with that heading or subheading. |
Building your own
Web site:
Microsoft Expressions (ME) Web Page Builder
Inserting and formatting Photographs/Images
HTML
Title and Meta Description and Key words
Publish Your Web Pages from Microsoft Expressions
On
the main menu at the top of the ME page is a menu named 'Site.'
InMotion Hosting Email Account
Your
Web Page on Internet Explorer
Combining/Eliminating Rows or Column
Novices in the use of HTML, the language of the internet, now have a friend to help them build and maintain their own web sites. It is a free product from Microsoft called Microsoft Expressions 4.
Microsoft Expressions is a very user friendly WYSIWYG program for designing your web pages. What does WYSIWYG mean. Simply "What You See Is What You Get." The program has all the rich features of other web page builders, coupled with ease of use.
Begin your journey of 'web mastering' by downloading the free software from Microsoft.
http://www.microsoft.com/en-us/download/details.aspx?id=36179
Go to this web site and download the free program.
Once it is installed, click on the .exe and start the program.
Microsoft
Expressions will automatically save your files in a folder it creates named 'My
Web Site', beneath your 'Documents' folder.
You can also create your own folder and save your files there.
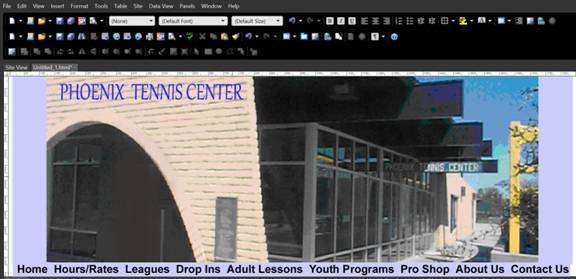
ME main page.
When you first start ME, this is what you will see.
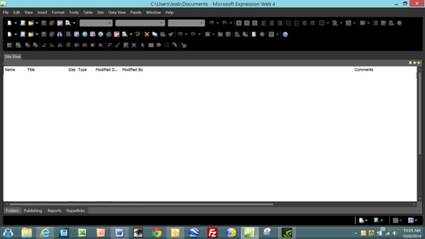
The large white area is your work space. Here you will insert Tables, text, images and background colors.
Open Microsoft Expressions (ME) and click on upper left menu labeled 'File.'
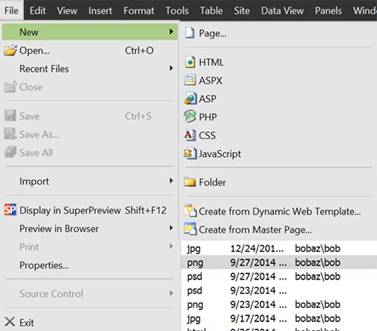
When you
click on 'New', a sub menu will appear. Click on 'html'.
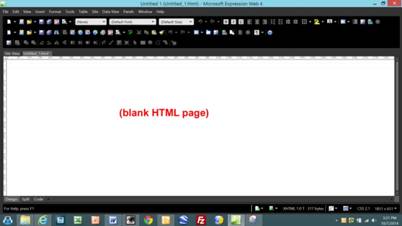
You will
now be presented with a blank page for you to populate.
You are
now ready to start designing a web page.
First a note on 'Tables.'
Note:
Once you have mastered Tables.......you have mastered Web design.
One of the difficulties of designing a web page is the 'alignment' issue. When you insert text and images, they can get out of alignment with how you want your
page to look. I urge you to use 'Tables' liberally. We will start with a basic table and explain some of the ways to adjust the cells within a table to make your page look professional.
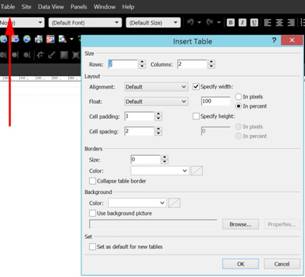
At the top of this dialogue box you will see 'Size'......Rows and Columns.
Decide what you want in the first segment of the web page: in this case the top
of the page. It will be normal to have more than one table on a page. In this instance, we will have a large image at the top of the page so we will change the 'Rows' to 1 and the 'Columns' to 1. That means, in this table we will only have one Cell. You can leave Cell padding and Cell spacing as they are shown. If you want a border (which is not recommended) you can specify the Size (in pixels) and the color. Also, you can choose a background color for your Cell.
Click 'OK'.
Note the cursor is in a large rectangular box. This is the cell of the table and since it only has one column, that column will stretch from the left side of the page all the way to the right side.
The first thing you will want to do is to 'format' the cell. With the cursor in the cell, right click the mouse.
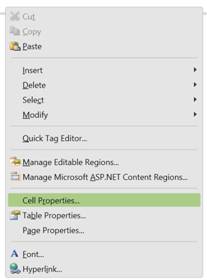
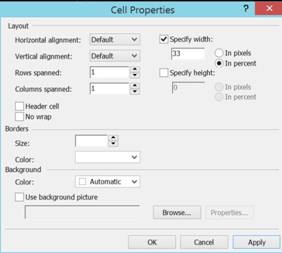
Now click on 'Cell Properties.'
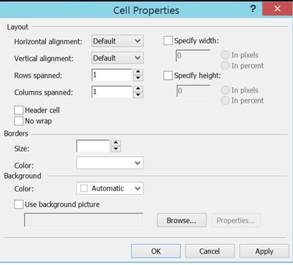
Since we only have one row and one column, we will only be concerned with the top two items: Horizontal alignment and Vertical alignment. These two items will format your cell. Begin with Horizontal.
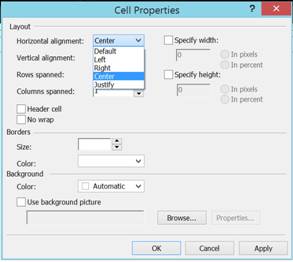
In almost all cases, I choose the 'Center' as the horizontal alignment. Anything, text or an image that you put into the cell will be automatically centered. There are many cases where you will select 'Left' when inserting text. Click on it and then click on Vertical.
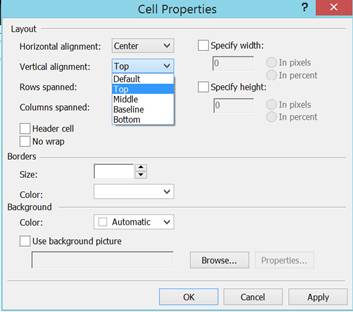
In most cases for vertical alignment, you will choose the Top of the cell when inserting images and text. If you want a margin at the top, you can always place your cursor in the cell and hit your 'Enter' key and the cursor will move down.
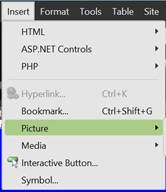
Next, let's insert an image into the cell. Click on the 'Insert' menu, see the drop down, then click on the 'Picture' item. Click 'From File.'
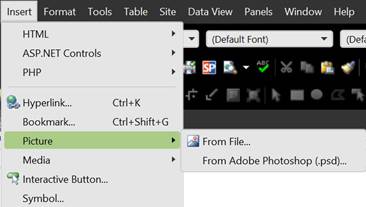
In order for this to work, you must have images on your computer that you want to insert. AND, THE MUST BE IN THE SAME DIRECTORY AS YOUR PAGE. USUALLY IN YOUR "My Web Site" DIRECTORY. This is where Adobe Photoshop comes in handy. All the images in this document were either produced or edited in Photoshop. If you don't have an image and need one, contact Bob he will supply you the image or edit the image (crop, contrast, etc).
We are going to insert an image that has been through the Photoshop edit process.
Click on 'From File' and it will take you to your folders. Find the image and click on it. Images will either be .jpg .png or .gif format.
When you click on the file, a dialogue box will appear, "Accessibility Properties.'
It is asking you to name this picture. The reason for this is that if a browser isn't able to show the image, it will display the name of the image. Once you name the image and click 'OK', your image will be inserted.
From here,
you can use the ‘Insert’ command to insert photographs in the document.
The key here is the formatting.
First insert a photograph.
After you insert it, you can resize it by putting your cursor on the lower right
corner and dragging it inward to make it smaller, or out to make it bigger.
If you
want a more professional look, right click on the image and click on ‘Picture
Properties’.
In the
'General' tab, type in Alternate Text (name of the photo).
Then below you will see 'Hyperlink' which is where you put the URL of a
link if someone clicks on the image. More on Hyperlinking later.
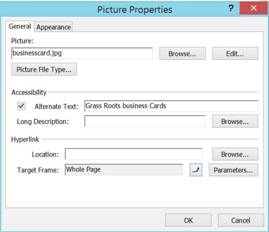
At the
bottom of 'General' you will see 'Target Frame'
Click on the little pencil and see the drop down.
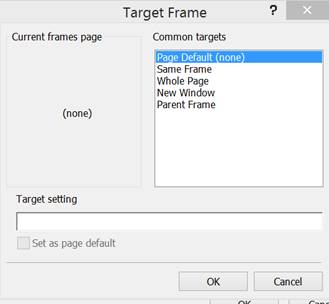
Select
'Whole Page'. This is telling the
program to look for the photo in the entire page.
This is an important step.
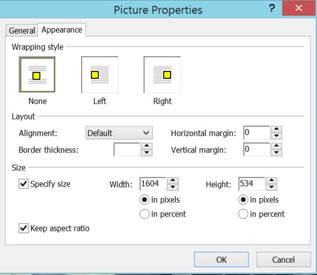
Next click
on the 'Appearance' Tab at the top.
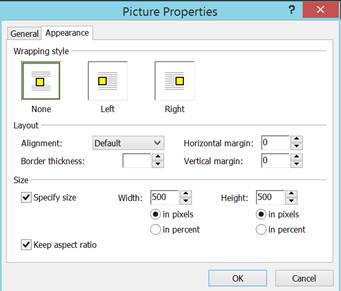
This is
where you can force the location of the file under 'Wrapping Style' and below,
specify a size. You can ignore 'Wrapping Style'
since this is also accomplished in the ME menu.
Next you
will choose the layout of your photo.
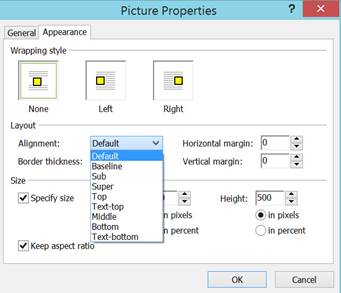
These are different alignments your photo can have. You can experiment with the different alignments at your leisure. For now, leave it as 'Default.'
Now you can specify a size for your image.
Note you
can turn off 'Keep Aspect Ratio' so if you start with an image that is 500
pixels X 400 pixels and you want it to be 500 pixels X 200 pixels, you would
turn off the 'Keep aspect ratio' (click on the check mark in the box and it will
disappear) and type in the new values in the Width and Height boxes.
Once you
have your photo inserted and you have typed in information regarding the photo,
go to the ‘File’ Menu and click “save as”.
Click on the down arrow for “Save as Type”.
Click on ‘Web Page' (html).
Your
'Home' page is always titled
index.html. So name your home
page index.html.
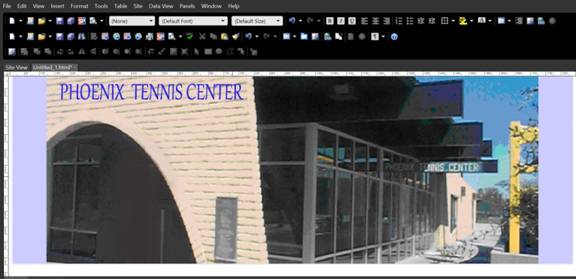
You now
have your top image inserted.
The image is inserted into the cell.
Notice that the image does not fill the entire cell. We can adjust/re-size the image. We can put our cursor in the lower right corner of the image, click, and drag the image, making it larger. We can drag and stretch the image so it fills the entire cell. We can also right click on the image and get the dialogue box.
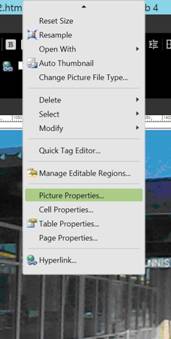
Click on 'Picture Properties.'
And click on Appearance.
This is where you can change the Width and Height of your
image. The
Let's assume we do not want the image to fill the cell, but we don't want all the white space. This is where we can choose a background color.
Videos are fairly easy. You must first set up a Youtube account.
In your browser, go to www.youtube.com.
Here you will set up your account. Once you have set up your account, you can upload your videos to Youtube. Each video will have its own URL. When you insert a video in your web page, you will then hyperlink the video image to the URL. When a viewer clicks on the image, the video will play.
In Web Expressions, SAVE the page you are editing.
PUBLISH to your site.
REFRESH your site on the Inmotion page with two panels
UPLOAD the page (copy from left panel to right panel)
In Explorer, refresh the page REFRESH
VIEW the new page
Background color is achieved by right clicking on the white space within the cell and choosing 'Cell Properties.'
Toward the bottom of the dialogue box is a heading: "Background." Below that is a sub heading: "Color." Next click on the down arrow next to the word 'Automatic.'
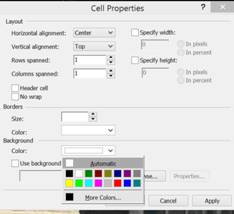
You will be presented a list of standard colors. Click on 'More Colors.'
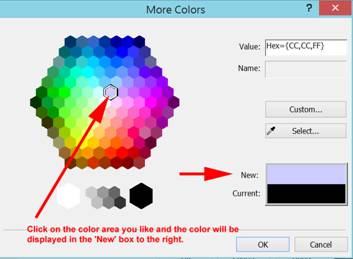
When you find a color you like, click on 'OK.'
You can have a background color for each cell or you can have the same background color for all cells as you will soon see.
I suggest you place your main menus below your image heading. First, place the cursor below the top Table and click on the Table menu. Insert a table that has one row and one column. Also, give it the same background as the top heading. You are now ready to add the menus for your web site. You will need to decide the types of pages you will want for the web site and the font type and size of the font. Also whether it is normal or bold and or underlined.

Next, type in the names of the menu pages you want to link to later. Here is an example.
At this point, if you have not already done so, you should sit down like Rodin's guy and think through what you want to communicate to your audience. Plan each subject and how that subject is presented in the menus. You don't need to design the pages that will make up the menu items at this time: simply give them some thought and add your menu headings
You can always change the menu items later. There will be more about menus and linking each menu to the associated page.
We will now insert a table below the table #2 menu. Only, this time we will have more than one column, we will have three. We will keep the single row. Place your cursor below the top image and then select 'Table.'
Change the table to one row and three columns and select 'OK.'
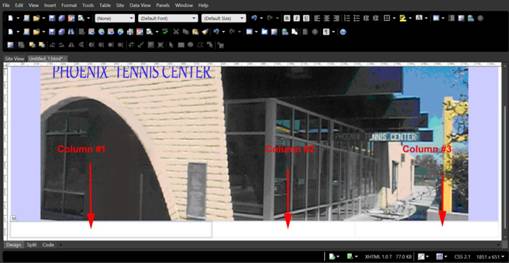
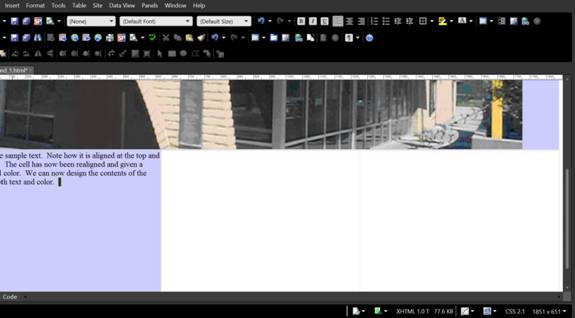
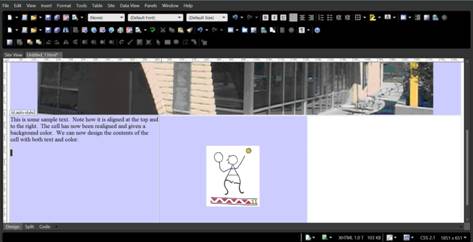
We will now insert some text into Cell #1.
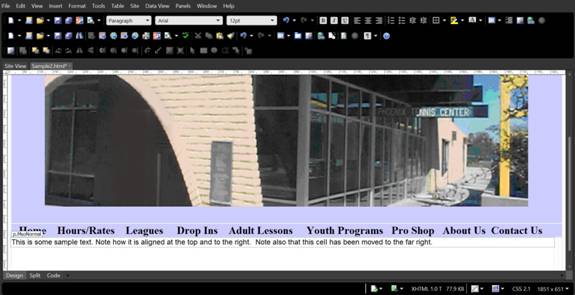
This is the text.
"This is some sample
text. Note how it is aligned at the top and to the right.
Note also that this cell has been moved to the far right."
No need to be concerned about the cell movement. This is where we go back to Cell Properties and the choices at the top right of the dialogue.
Right click on the cell to view the dialogue box for Cells. Click on the Cell Properties menu.
We will now specify the width of this cell as a percent of the entire page width. Since we have three columns, we can specify this cell as 33% (if we want the three cells to be of equal width) of the total width.
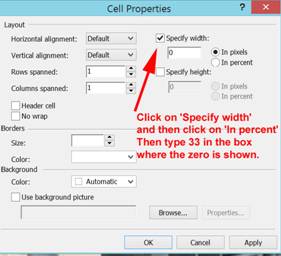
The result is that Cell #1 was automatically resized to one third of the page width.
The alternate method is to specify width in pixels. This is easier than it seams. At the top of the ME page is a pixel ruler showing 0 on the left and 1800 on the right.
You can specify sizes in pixels to be more exact.


If you want your columns to be of different widths (all totaling 100%) then use this dialogue to specify each width as a percent of the page or in pixels.
Now that we have our columns and a specified width, we need to adjust the cell for the type of cell we want. Do we want text and images centered? Aligned to the right? What kind of background?
We decide to leave the Horizontal and Vertical the same and select the background the same as the first table.
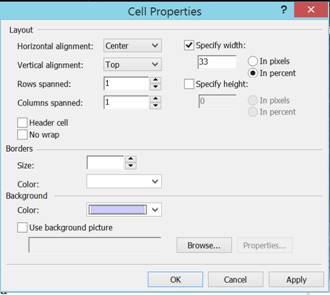
Click on 'Apply' and then 'OK.' The Cell background color has changed.
If I place my cursor at the end of the sentence and press 'Enter' on the keyboard, I can expand the cell downward.
It is easy to edit or modify text that you have inserted. Simply put your cursor at the location in the text you want to modify and delete or add text.
Let's assume that we want an image in Cell #2 and more text in Cell #3.
Place the cursor in the middle cell and click on the 'Insert' menu at the top and then 'Picture.' Select the image you want to insert. Remember, it will ask for a name.
Once placed, we need to configure the cell. In this case we will center the image and give the cell a background color.
Summary of how to work with Tables. In Table Properties, select the number of rows and columns. Decide on your layout: number of rows and number of columns. Decide if you want text and images left justified or centered. Decide on the background color.
At this point, you should be comfortable working with Tables and Cells, formatting, inserting text and images and backgrounds.
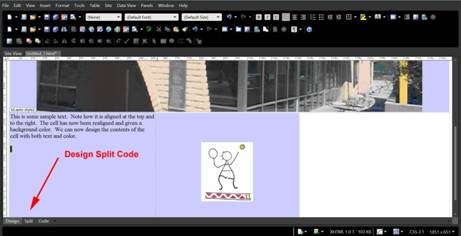
The next
significant topic is in the lower left.
'Design' 'Split'
and 'Code'.
This is
VERY handy. Design is how your page
will look in the browser. Code is
the html code for your page and split is a command to split the screen so you
can see the Design and the code on the screen.
Here we have a split screen.
This
allows you to make changes in the code and see the affect on the design or visa
versa.
It will
take some time to learn what the HTML code means but you can go through life
building web sites without becoming a HTML programmer.
Let's take
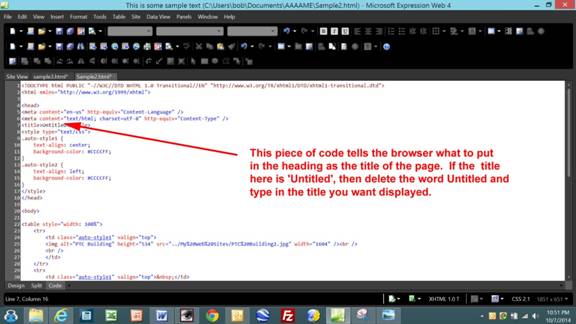
one example.
Every page
has a title that is displayed above the browser menu when the browser opens the
page.
![]()
Here we
see the title of two pages: PTC
Home Page and NBC News - Breaking News.
These are the titles of the pages being viewed.
You can
change the title page inside the HTML code.
Click on 'Code.'
The next
part of this exercise is adding the key words and web site description to the
code so search engines can find your page.
When someone types in a word or several words in a search engine like
Google, they will find your page based on the descriptive words you put in and
the key words you add to your HTML.
Your web page does not include the two main lines for search engines.
These two lines are what the engines look for and will link your page to the description and key words.
1.
2.
Copy and
paste these two right after the Title code.
Each page will have a different description and keywords.
<meta
name="description"Home page for the
<meta
name="keywords" content="Tennis,
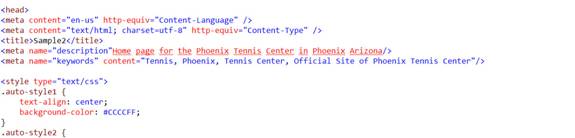
The two
lines after <title>Sample2</title> is the place to paste the <meta
name="description" and meta
name-"keywords". Replace the text
in description and in keywords.
Make sure you leave the spacing and punctuation as it is shown here.
The more
you continue to work with web pages and view the underlying HTML code, the more
you will feel comfortable with HTML and how it works.
Sometimes when you are designing your page, HTML will throw a curve in there.
For instance, when I was designing the pages for the
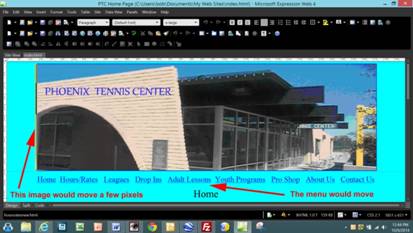
As I clicked on each menu item, going from 'Home' to
'Hours/Rates' and the rest, the
This is a technique you can use on other problems. It is the old Cut and Paste trick.
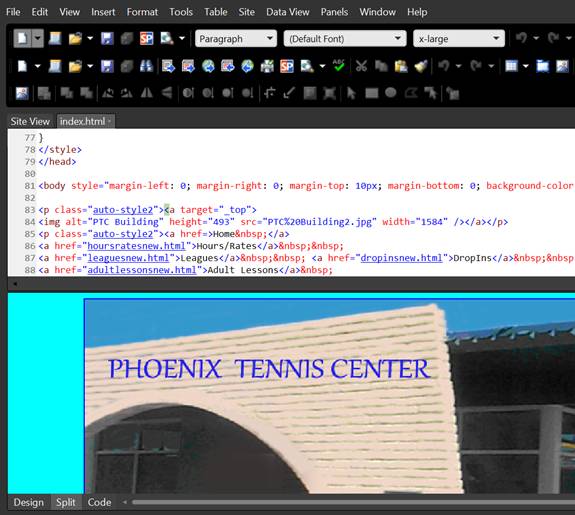
The red arrow is pointing to the html code for the image, background and menu items. How did I find this in the code?
When you are in the design mode (viewing your page) you can click on any location, text or image and then switch modes to 'Code.'
The place in the code where your cursor is in the design will be highlighted.
So I first found the code in the Home page, highlighted it and copied. Then I went to my next page, 'Hours/Rates' and found the same spot in the code. I highlighted the code and deleted it. Then I pasted the code from the Home page. It works. When I jump from one page to the other, there is no movement of the image or the menu.
Hyperlinking is a fancy term that simply means you have linked two elements together so when you mouse click on one, the second element is displayed.
Sometimes you link an image to another page or text to
another page. In the
We must first design a page for each menu item and name it. Here we have nine pages.
Home, Hours/Rates, Leagues etc. When you name the file, give it a .html extension.
Home = index.html
Hours/Rates = hoursrates.html
Leagues = leagues.html
Important Note on
Hyperlinking: Before you hyperlink
one of your own pages (like menu items), you must first have an html file to
link to and that page must be saved in
the same directory as your home index.html page. You don't have to have the page
fully constructed, but you must have it existing and saved.

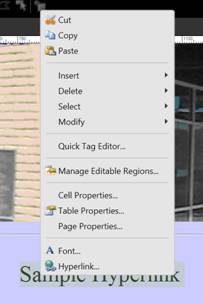
Each menu item has been hyperlinked to a page with that subject/name. Right mouse click on one of the menu items.
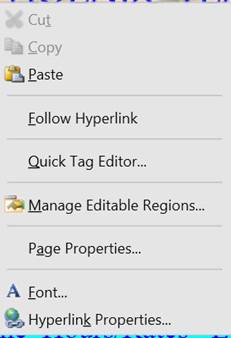
At the bottom of the drop down is "Hyperlink Properties."
Select it.
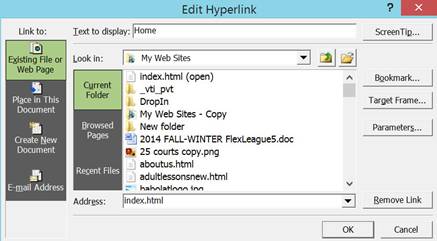
The Edit Hyperlink dialogue is presented. We clicked on the menu item 'Home' which is the index.html page. Note at the bottom the Address is index.html.
We will now make a new link. The sampleindex.html file is opened and the words 'Sample Hyperlink' have been typed. Highlight both words and right mouse click. This dialogue box will appear.
Mouse click on 'Hyperlink.'
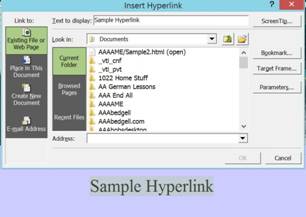
Note it is the same as the 'Edit Hyperlink' but the
dialogue box is named 'Insert Hyperlink.'
In the "Address:" bar you will type the name of the web page you want
linked. If the page is in the same
directory as the page you are working on, then simply type in the name of the
page. In the
Menu Item
Hyperlinked Page
Home index.html
Hours/Rates hoursratesnew.html
Leagues leaguesnew.html
Drop Ins dropinsnew.html
Adult Lessons adultlessonsnew.html
Youth Programs youthprogramsnew.html
Pro Shop proshopnew.html
About Us aboutus.html
Contact Us contactusnew.html
Note how the hyperlinked pages have been named. There are no spaces, capital letters or punctuation marks.
After you complete your home page and your additional pages for your web site, you are ready to start hyperlinking. Remember, your page must be started, named and saved in the same directory as your home (index.html) page before you can hyperlink.
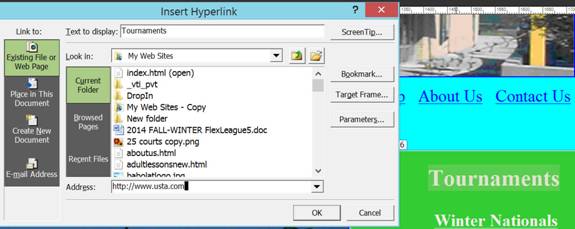
Sometimes you want to hyperlink to another web site instead of a web page you control. This is easily done. You simply type in the URL of the web site in the Address bar. In this example, we want to hyperlink the word 'Tournament' to the U.S.T.A. web site. We highlight the word Tournament, right mouse click and receive the 'Insert Hyperlink' dialogue box. Here we have typed in the URL to the USTA web page.
http://www.usta.com
At any point in your web page design, you can preview it so you can see how it would look in a browser. First save your page as an html page.
Next, go to the File menu and click on Preview.
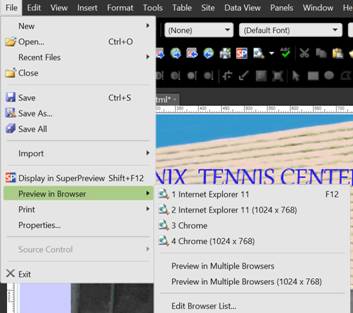
Choose the browser you will use for the preview.
The next scene you will see will be your preview.
Once you have your first web page constructed, you are ready to contact an ISP (Internet Service Provider) and make your purchase. You will be purchasing space on their servers, their connection to the world wide web and their tech support. In this example we will use an ISP named InMotion Hosting.
You can
cut and paste this URL into your browser and arrive at the InMotion site.
You then
choose the plan you want to purchase.
For the most part, the basic Business plan should work for you.
http://www.inmotionhosting.com/?utm_source=Google&utm_medium=CPC&utm_content=44644959143&utm_campaign=Search+-+Branded&utm_term=inmotion+hosting+-+Exact&GUID=38333037323135303130-7365617263682D6272616E646564-696E6D6F74696F6E686F7374696E67-696E6D6F74696F6E686F7374696E67-6578616374&gclid=CMX8zqaF-8ACFRNffgodTnEAEg
InMotion
is user friendly and easy to use and not expensive.
In addition, they are aggressive in assisting you for free in setting up
your web site and making sure you have all the information you need to be able
to 'Publish' your web pages to their site.
You will
need to choose your domain name.
On the
front page of InMotion Hosting is a menu item named 'Domain.'
Click on it.
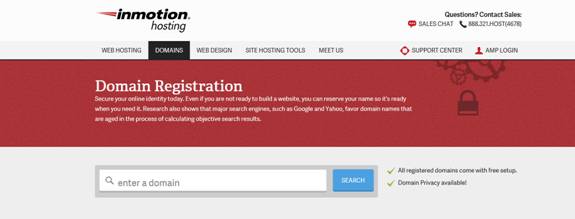
This is a
tool offered by InMotion that allows you to check to see if a domain name has
been taken. The InMotion internet
engine searches several locations to see it the name has been taken.
For instance, I typed in phoenixtenniscenter.com and it was already taken
by someone else. I then typed in
phoenixtenniscenter.org and it was also taken.
Finally, I typed in phoenixtenniscenter.net and viola, it worked so I
quickly purchased the site from InMotion.
The
information you will be provided by InMotion is the following:
host: biz157.inmotionhosting.com (the gateway to their servers)
Domain name: phoenixtenniscenter.net
User: edgell@cox.net
password: XXXXXXX
home directory: home/phoeni72
Domain Name: The technician will ask for you to verify your Domain name.
There are two areas within InMotion that you will be using. One is the Account Management Panel (AMP).

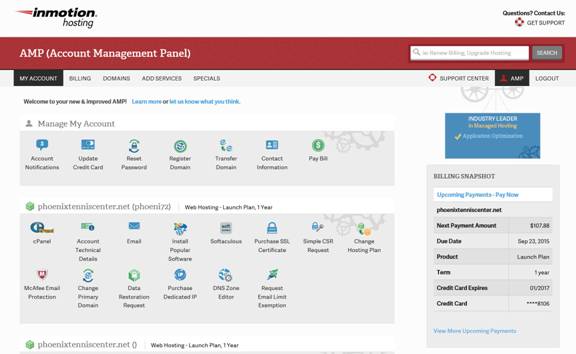
Essentially, this is how you manage your account. There really is not a lot you need to do in the panel. As you can see, most of the headings are informational. Note item: cPanel. This is a separate panel with a different user name and password.
User Name: phoeni72: Pass: kokopella11matt
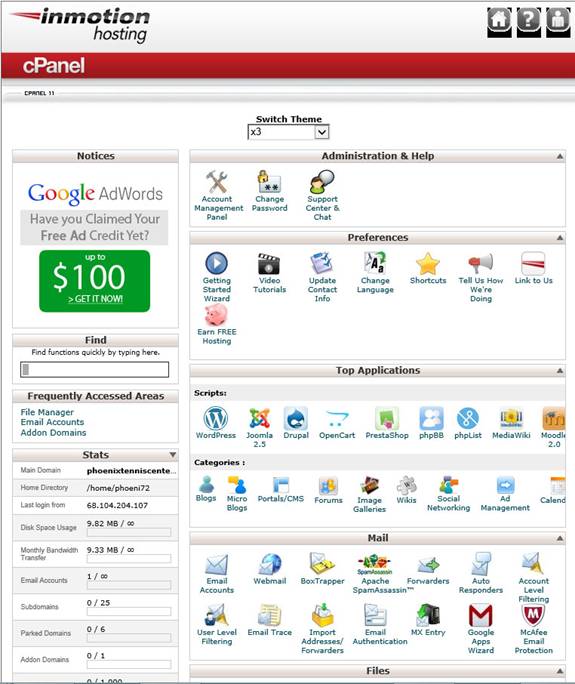
There are a lot of little goodies in the cPanel and you can experiment at your leisure.
When I purchased my site on line, I immediately received an email from InMotion technical support. They urged me to call so a technician could walk me through the setup. THIS IS EXTREMELY HELPFUL. You will set up your ME so you can publish your pages to the InMotion 'Host.'
Microsoft Expressions has a built in FTP (File Transfer Protocol) feature. This feature allows you to connect to your personal site at the ISP and upload your files. InMotion technical support will walk you through the process, plus help you set up your InMotion email.
Click on this menu and you will see this pull down.
![]()
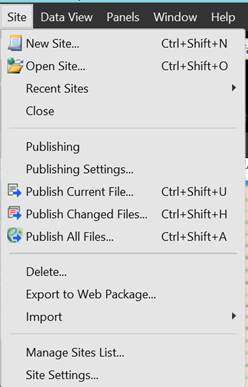
We are mainly interested in the 'Publishing' part of the drop down. Now click on 'Publishing Settings.'
This is where you want to be when you telephone the InMotion tech support.
The technician will provide you the 'Host' information as well as your user name, password and site name. This is the information for the PTC web site.
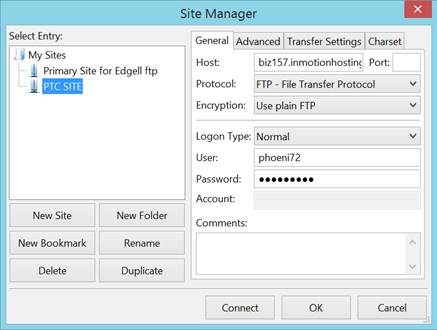
User:
phoeni72: Pass:
XXXXXXXXXX
Once you
have this set up, you are ready to upload files to your site and view your web
pages.
Since you
have your 'Home' page partially constructed, let's go ahead an upload the files.
I already have a web site so I will use that as an example.
Go to the
Site menu, click and see drop down.
Click on 'Publish.'
If you
have already published and this page is resident, you will want to 'Refresh' the
folders. Go to the top menus
and click on 'View'. At the bottom
of the dropdown is a "Refresh" button.
Click on it.
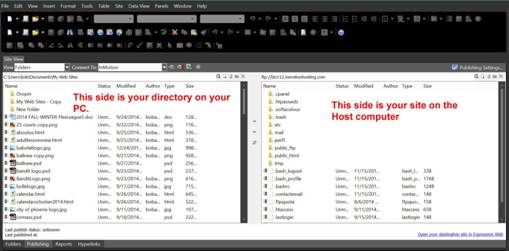
As noted,
the left side is the directory on your PC where you have saved your files.
In this case it is a folder called 'My Web Sites' under the Documents
directory.
The right
side is your site on the Host and may look like a bunch of gobbledygook.

A couple
of items to note on the left side.
The arrow points to the current directory being displayed.
Just above that is a window named "View."
You can click on the down arrow to see the choices but you will rarely if
ever change the View.
On the
right side is your Host site. This
has the ftp of your Host location. Note at the end of the address is
'public_html.' This is where you
will populate your site so it can be displayed on the world wide web.
If you have several web pages, each page will be named and saved with a
.html extension and inserted in this public_html area.
Also, you will need to upload all your .jpg images that are on your web
pages.
Note if
there are two folders at the top:
vti_cnf and vti_pvt, be sure to
upload them also.
Now go to
the menus at the top of the page and click on the menu 'View'.
There is a command on the drop down called 'Refresh."
You will need to refresh this directory before you publish your files.
1. Make your changes/edits in ME.
2. Save changes (File)
3. Publish (Site menu) to your host, In Motion under folder 'public_html'.
4. Click on 'Refresh' (under View menu) and Drag the html file and .jpg files from the left side (your documents) to the right side.
5. Go to Explorer (or your browser) and click on Refresh to refresh the web page.
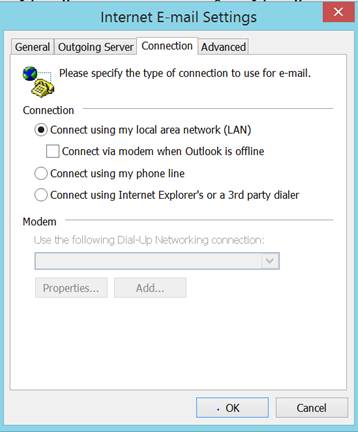
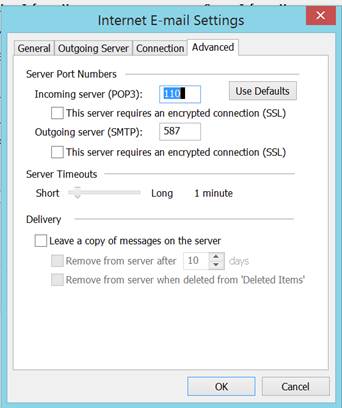
While you have the technician on the phone, take a few
minutes and set up your email account.
For the
Go to your email accounts and add the In Motion Hosting.
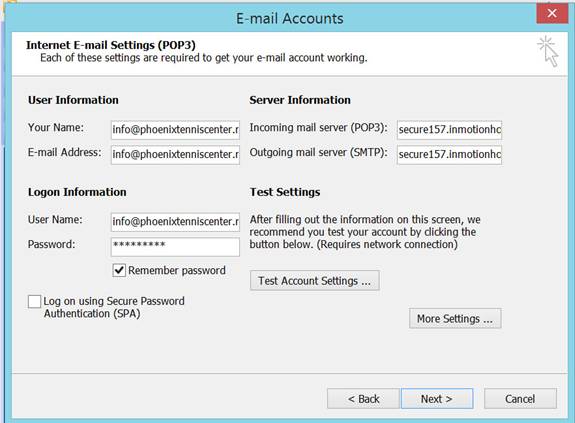
User Information: name and email address are both info@phoenixtenniscenter.net
Logon: User name: info@phoenixtenniscenter.net
Password: XXXXXXXXX
Incoming Mail server: secure157.inmotionhosting.com
Outgoing Mail server: secure157.inmotionhosting.com
Click on 'More Settings....'

When you
or anyone type in your URL, the system world wide web will almost instantly find
your ISP provider and your page.
So, what
is your URL?
Your URL
is the address after http://.
It begins with your domain name that you chose.
For instance, the
You are
able to construct several web sites and place them on your Host site.
One way of doing this is to create a sub-directory beneath the
public_files directory. A case in
point is my account with InMotion.
My domain name is bedgell.com. I
have a personal page and a page for the Drop In group. So here is what my
directory looks like:
public_files
edgell
http://bedgell.com/edgell/index.html
I have
several hyperlinks to other pages on my web site.
I put them in the edgell sub-directory with
background
http://bedgell.com/edgell/resume.html
author
http://bedgell.com/edgell/authorpage.html
The lesson
point here is that you can have several web sites (wedding photos,
vacations....) and you can keep them in separate sub-directories.
This is easier and more organized than keeping them all in one 'bucket.'
Now go to
your Internet Explorer and type in
your URL and view your newly created web page with photos.
If you are like me, you will view the web page in Explorer,
the actual internet page that all visitors will see, and you will want to
make some adjustments. This is the
easy part. Open your .html page in
ME and make the changes, save as a web page (it should automatically save in the
directory you first chose), hit refresh and upload/publish the image directory
and the .html file.
Now go to your MS internet explorer, refresh the page and look at your
changes. Be sure to refresh your
page because Explorer and other browsers cache a copy of the last viewed page
and will display the old version.
You may find that your background extends far beyond the bottom of the page and you want to shorten it so that it ends right after the page ends. Here is what it looks like at the end of the page.
You want to eliminate all the excess blue background. Mouse click on 'Code' in the lower left.
![]()
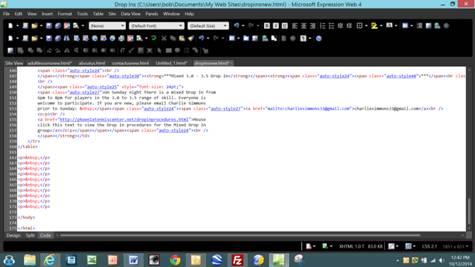
Note the arrow is pointing to several identical pieces of code. These are carriage returns. High light them and delete. This will remove the extra background space.
After you have placed a table into your page and populated some of it, you may find you want to combine a row so it is one column across the page instead of a split row with two columns.
Select the row and right mouse click.
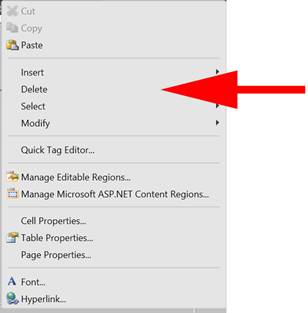
The 'Insert' item allows you to insert rows and columns.
The 'Delete' item allows you to delete tables, rows and columns.
The 'Select' item allows you to select a table, row or column
The 'Modify' item allows you to merge or split rows or columns. You can also distribute columns evenly or auto fit contents into a cell.
A NOTE ON
HTML PAGES: In this document, I use the
term HTML and htm. I always save my
files as a .html.
HTML
stands for “hyper-text markup language”.
This is computer Geek term which merely means it is a formatted page that
all browsers can view.
If you are
lazy like me you will forego learning to code with HTML and just use Microsoft
Expressions to construct your web pages.
If you are
interested about HTML and coding to build a web site, you can go to this site.
http://www.htmlcodetutorial.com/document/
You may wonder how web sites get listed on Google and other search engines.
Search engines are always at work: 24/7. What are they doing? They are 'crawling' the world wide web to every ISP and every web site in that ISP and recording information about each site and putting that into their search criteria. The information they are recording is the information you put in 'meta name description' and meta name keywords.'
Good luck,
This
should get you started.
Bob Edgell
602-999-2147